| MAGNABEND HANDYMAN MODEL |

TRAY
 This
easy to make tray attaches to the rear of the Handyman machine via 2
angle brackets which are supported via the Backstop bars.
This
easy to make tray attaches to the rear of the Handyman machine via 2
angle brackets which are supported via the Backstop bars.
The construction consists of 3 right-angle bends in 1.6 mm steel.
If the corner detail shown in the layout drawing below is followed then it should result in tight corners in the tray which will not require welding.
It is not really necessary to follow the fine detail shown in the corner layout; the main thing is to have the corner cutouts aligned with the bend lines, although it may be helpful to approximate the detail with a diagonal nick made with a thin cut-off disc in an angle grinder.
If bending this tray with a Magnabend then it is preferrable to use the slotted clampbar as this will assist in getting a tight intersection at the corners.
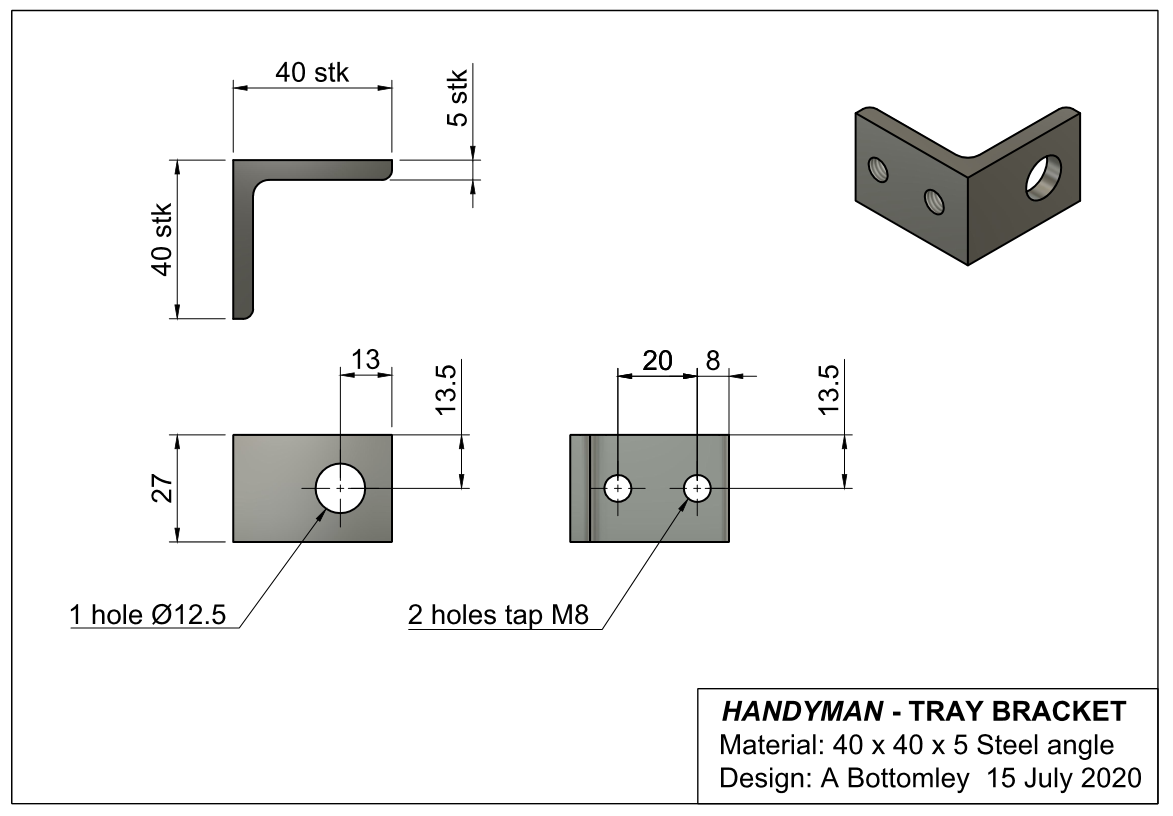
The tray attaches to the angle brackets with M8 x 8mm long button head screws, two on each side. However you can use any type of M8 screw to attach the tray. Also, if the correct length (8mm) is not readily available, just use longer screws and cut them off flush with the angle bracket after installation.
Optionally you may like to add a rubber mat to the tray. (For example 3mm flutted rubber matting).
TRAY LAYOUT DRAWING: Enlarged view, PDF Drawing.

TRAY BRACKET DRAWING: Enlarged view, PDF Drawing.
Return to "Handyman" Index page.
Contact Alan Magnabend Homepage Alan's Homepage
This
easy to make tray attaches to the rear of the Handyman machine via 2
angle brackets which are supported via the Backstop bars.The construction consists of 3 right-angle bends in 1.6 mm steel.
If the corner detail shown in the layout drawing below is followed then it should result in tight corners in the tray which will not require welding.
It is not really necessary to follow the fine detail shown in the corner layout; the main thing is to have the corner cutouts aligned with the bend lines, although it may be helpful to approximate the detail with a diagonal nick made with a thin cut-off disc in an angle grinder.
If bending this tray with a Magnabend then it is preferrable to use the slotted clampbar as this will assist in getting a tight intersection at the corners.
The tray attaches to the angle brackets with M8 x 8mm long button head screws, two on each side. However you can use any type of M8 screw to attach the tray. Also, if the correct length (8mm) is not readily available, just use longer screws and cut them off flush with the angle bracket after installation.
Optionally you may like to add a rubber mat to the tray. (For example 3mm flutted rubber matting).
TRAY LAYOUT DRAWING: Enlarged view, PDF Drawing.
TRAY BRACKET DRAWING: Enlarged view, PDF Drawing.

Return to "Handyman" Index page.
Contact Alan Magnabend Homepage Alan's Homepage
This
page last updated: 16 July 2020